Hi... today we will talk about another important component used in the embedded domain called a relay.
Relays are electric switch which uses electromagnetism to either form or breaks the existing circuits. With the help of a relay, you can trigger a high voltage operation by a low voltage input signal. Relay is a highly versatile component that is as effective in a complex circuit as in a simple circuit.
In this article, we will talk about how to interface relay with PIC18 controller.
We will cover the topics in the following points:
- About the interfacing task
- Software tools used
- Required components
- Circuit diagram
- Code for controller
- Upload the HEX file
- Run simulation
About the interfacing task
In the interface relay task, with the help of a push-button, we will trigger the relay to control the lighting of the bulb which is of higher voltage.
When we press the push button the microcontroller will trigger the relay to change its state, when the relay changes its state from normally closed to open it will light up the bulb.
Software tools used
For this simulation task the software tools used are:
- Proteus professional 8 (circuit simulation)
- MPlab IDE (generating HEX file)
Required components
For the simulation process the required components are:
- PIC18F4520 controller
- Relay (5V)
- Push-button
- Bulb
Circuit diagram
The circuit diagram for the task is given below.
From the circuit diagram, we can see that the push button is connected to Pin 33(RB0) and the relay is connected to Pin 15(RC0). The bulbs are connected to the normally open pin of the relay.
While making connections please make sure all pins are connected to the right terminals.
Code for controller
After, connecting all the circuit components now it's time to write the code and generate the HEX file for the controller.
The code for the controller is given below.
#include <xc.h>
#define _XTAL_FREQ 20000000
#define button RB0
#define relay RC0
void main()
{
TRISB0=1;
TRISC0=0;
if(button==1)
{
relay=1;
}
else
{
relay=0;
}
}
After writing the above code now run, compile and generate the hex file.
Upload the Hex file
After generating the hex file now it's time to upload it to the microcontroller.
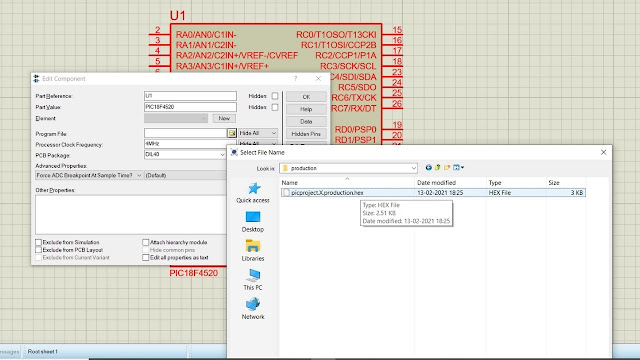
To upload the hex file to the microcontroller all you need to double click to the microcontroller and select the Hex file.
Simulate the project
After uploading the Hex file all you need is to simulate the project.
To simulate the project you need to click the play button at the bottom left side of the simulator.
Hence our task interface relay to PIC18 microcontroller is complete.


