Prediction using KNN(K-nearest neighbor) algorithm
Hi... there is this blog we will we be working machine learning model using KNN algorithm.
We will take a dataset whose feature column names are hidden but the target class are given, hence we just create a model with KNN algorithm.
The dataset I used is from kaggle.com.
This model will able to predict the target class on giving new data features.
But before that lets quickly recap what is KNN.
- KNN(K-Nearest Neighbors) comes under the category of Unsupervised Machine learning.
- KNN is a simple algorithm that stores all the available cases and classifies the new data or cases based on similarity measures.
- KNN is used in the search application where you are looking for similar items.
- KNN is a lazy learner because it doesn't have a discriminative function from the training data, but what it does it memorises the training data. There is no learning phase of the model.
we will complete these tasks on the following steps:
1. Import Library
2. Reading Data
3. Scaler method
4. Preparing data for ML model
5. Training the model
6. Testing the model
7. Checking the accuracy
8. Finding the optimum value of K
9. New prediction using the optimum value of K
10. Rechecking the accuracy
Importing Library
First of all, we will import all the required python libraries for our task.
For this task, we will import pandas, NumPy, matplotlib, and sklearn.
code
import pandas as pd
import numpy as np
from matplotlib import pyplot as plt
from sklearn.preprocessing import StandardScaler
from sklearn.model_selection import train_test_split
from sklearn.neighbors import KNeighborsClassifier
from sklearn.metrics import classification_report,confusion_matrix
Reading the Data
After importing all the required libraries now we will read the data from the dataset and try to observe the insights.
code
data=pd.read_csv('classified data',index_col=False)
data.head()
From the dataset, we can observe that the column feature names are hidden but the target class are given, hence we can use the KNN algorithm to predict the target class.
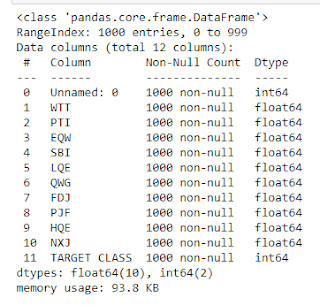
data.info()
data.info() shows us the data types of each column, it also tells us the null values present inside the column.
Scaler method
On KNN classifier we need to fit the variables on small scales because the larger scale variables can affect the distance between the observation.
Hence we will use standard scaler function, it will transform the larger values into smaller values.
code
x=data.drop('TARGET CLASS',axis=1)
y=data['TARGET CLASS']
scaler=StandardScaler()
scaler.fit(x)
scaled_features=scaler.transform(x)
data_features=pd.DataFrame(scaled_features,columns=data.columns[:-1])
data_features.head()
Preparing data for the Model
After creating the scaled value now it's time to prepare the data for the model.
We will use the train_test_split function of the sklearn module.
This function will split the dataset into training data and testing data.
code
x_train,x_test,y_train,y_test=train_test_split(scaled_features,y, test_size=0.3)
print(f'Training data {x_train.shape}')
print(f'Training target {y_train.shape}')
print(f'Testing data {x_test.shape}')
print(f'Testing target {y_test.shape}')
Here you can see the splitting function split the 1000 rows of data into 700 training data and 300 testing data.
Training the ML model
After preparing the training data and the testing data now its time to train our model.
For that initially, we will take n_neighbor(k)=1 so that we can calculate the error and improve the model and increase the accuracy.
code
model=KNeighborsClassifier(n_neighbors=1)
model.fit(x_train,y_train)
print('Model is trained')
Testing the ML model
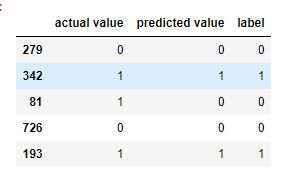
Now we will test the model and compare the actual value and the predicted value.
code
prediction=model.predict(x_test)
df=pd.DataFrame({'actual value':y_test,'predicted value':prediction})
df.head()
Checking the accuracy
Now we will check the accuracy using the classification report and the confusion matrix.
code
print(confusion_matrix(y_test,prediction))
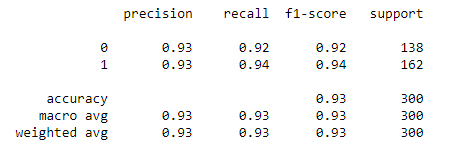
print(classification_report(y_test,prediction))
From the classification report, we can see that the accuracy is 0.93 but this we obtained by taking the n_nebors(k)=1.
This accuracy can be further improved by determining the optimum value of K.
After determining the optimum value of k again we can predict using the model.
Finding the optimum value of K
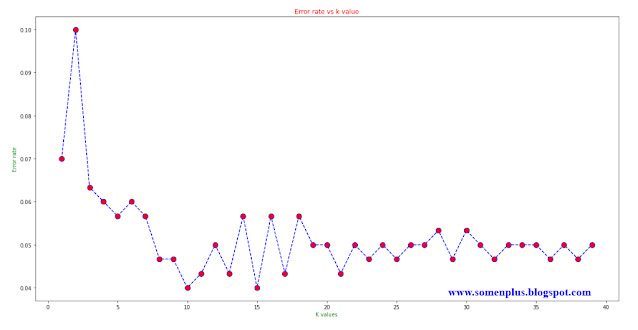
To find the optimum value of 'k' i.e. n_neighbors we need to find the error rate and a range of 'k' values.
After determining these two values we need to plot it.
code
error_rate=[]
for i in range(1,40):
model=KNeighborsClassifier(n_neighbors=i)
model.fit(x_train,y_train)
prediction=model.predict(x_test)
error_rate.append(np.mean(prediction!=y_test))
plt.figure(figsize=(20,10))
plt.plot(range(1,40),error_rate,color='blue',linestyle='dashed',marker='o',markerfacecolor='red',markersize=10)
plt.title('Error rate vs k value',color='red')
plt.xlabel('K values', color='green')
plt.ylabel('Error rate', color='green')
Making prediction using the new value of K
After determining the optimum number of k we will again do prediction and compare the result with the actual values.
Now we will give n_neighbors value is 23
code
model=KNeighborsClassifier(n_neighbors=23)
model.fit(x_train,y_train)
prediction=model.predict(x_test)
target_names=['0','1']
df=pd.DataFrame({'actual value':y_test,'predicted value':prediction})
df['label']=df['predicted value'].replace(dict(enumerate(target_names)))
df.head()
Rechecking the accuracy
Now we will check what is the accuracy of the model when we put the value k=23
code
print(confusion_matrix(y_test,prediction))
print(classification_report(y_test,prediction))
From the above report, you can see that the accuracy is improved to 0.95
Follow me on:
Linkedin - https://www.linkedin.com/in/somen-das-6a933115a/
Instagram - https://www.instagram.com/somen912/?hl=en
Github - https://github.com/somen912/open-repository/blob/master/KNN.ipynb
And don't forget to subscribe to the blog.
so...
Thanks for your time and stay creative...


